If you love food and especially good homemade bread, there's a good chance you have heard about the no-knead bread method developed by Jim Lahey back in the fall of 2006. The recipe was run by the New York Times and was instantly picked up across the country by local newspapers and took the internet by storm. It was through our local newspaper's food section that I came across the recipe. The procedure is unique in that no kneading is involved, very little yeast is used, and the rise time is anywhere between 12 to 18 hours. It is also baked at a very high temperature in its own little 'oven' so to speak within your regular oven.
Being one to turn down plain, gummy sandwich bread as I truly prefer the artisan loaves that cost $4 to $5 dollars at the grocery store, I figured this was my chance to recreate those chewy loaves with the incredible crusts that I so love for just pennies.
Here's my not-so-condensed version of the recipe with comments. You can follow the link above to Jim's posted recipe. As this procedure is unique, be sure to read it in its entirety before starting.
No-Knead Bread
3 cups all purpose flour
1/4 teaspoon yeast
2 teaspoons salt
1 1/2 cups water, barely warm
2 tablespoons water, barely warm
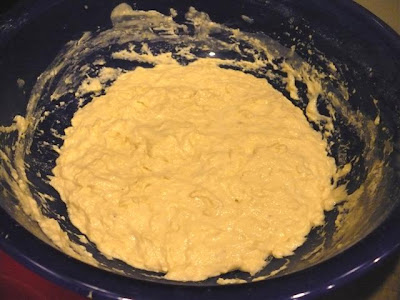
Using your largest mixing bowl, combine all of the above ingredients and stir using a large spoon. The dough will come together loosely and will be incredibly sticky. Just be sure all of the flour is incorporated - nothing vigorous is needed. Cover with plastic wrap or a baking sheet and set aside. I usually mix this up at night and let it set out while we are sleeping. The idea is to let the yeast develop over a long period of time, at least 12 hours. More time is ok too. I have had dough resting for up to 18 hours at times.
If you have a Silpat baking mat, sprinkle generously with flour. Otherwise you can sprinkle a clean dishtowel with the flour. Turn the dough out of the bowl onto this flour. You might find it helpful to scrape at the edges to release it as you hold the bowl over the flour. Do not try to use your hands. It will be way too sticky to touch. Using the outside edges, fold the dough over onto itself until it is somewhat piled up in the middle. This dough is very wet and does not hold its shape as you would expect regular dough to. Let it rest a while longer as you clean up the bowl and your hands, about 15 minutes or so.
Return to the dough, and gently begin to fold it over itself several times. The best way to describe this procedure (wouldn't a video be nice here?) is to fold over an edge towards the middle and press it down into the center, move to the left a little and repeat, continuing all around the dough. When the dough is somewhat shaped, re-flour the surface you are working on and invert the ball of dough onto it. It will again rest 2 or 3 hours. I take my large mixing bowl and turn it upside down over the dough to cover it.
There is one critical piece of equipment you will need, a covered cast iron dutch oven ... a covered roasting dish ... something that the bread will cook inside in the oven to develop that wonderful crust. The lid is essential. Place your cooking utensil in the cold oven and preheat to 450 degrees. Once the oven has reached temperature, carefully pull out the rack and remove the lid. This next step is the only tricky part of the recipe. The risen dough may have spread out a ways depending on the length of time of the last rising or how warm your kitchen is. Generously flour the top of the loaf, pick up the baking mat or towel with both hands and flip it over while holding it over the open pot. It will loosen and drop into the pot. You may have to give the mat a little shake but it should come loose if you used enough flour underneath it. Don't worry how it looks. Shake the pot a little if it needs to be centered a little better.
Cover with the lid and bake for 30 minutes. No peeking. The next step is to remove the lid to allow the crust to brown. 15 more minutes will do this nicely.
Alright, your loaf is ready. Turn off the oven and take out the pot. I simply put a knife or spoon alongside of the loaf and lift it out. Will you ever be amazed to look upon the best loaf of bread you can imagine. As hard as it will be, allow it to cool a little. As the loaf cools, it will actually crackle and pop a little as the crust does it thing.
Slice and serve. Be sure there are plenty of others around to share the bread with as it just might be entirely possible to try to consume the whole thing yourself. Really ... it is just that good!
Wednesday, March 25, 2009
The Famous No-Knead Bread Recipe by Jim Lahey
Labels: cooking
Subscribe to:
Post Comments (Atom)


.jpg)


+(2).jpg)


1 comments - click here to leave your comments:
Beautiful artisan bread! It looks absolutely divine. Far better than anything you can get in a bakery, right?
Thanks so much for joining Bread Week! I'll have my sourdough up tomorrow, after a somewhat delayed beginning. :D
Post a Comment
I'd love to hear what you think, so leave me a message. Have a great day!