Part of the fun of blogging for me seems to be learning new hacks to customize my space. A quick google search turned up My Live Signature which allows you to create your own custom signature. How fun is that?
This past week I've been battling a sore throat. A nasty head cold was brewing on my end after watching three of our kids go through the same scenario. But I was prepared...my special hot-spiced-honey-lemonade brew. Simple ingredients that do your ailing body good: lemon juice for Vitamin C, cloves for their antimicrobial and antiseptic benefits, honey for its soothing and antimicrobial properties, and ginger for its warming action beneficial for the respiratory tract. So here's the procedure.
In a saucepan or microwave proof glass container, pour in one cup water, a heaping teaspoon of whole cloves, and a slice of ginger (I keep candied ginger on hand since I don't always have access to raw ginger at a moment's notice). Bring this all to a boil, and then continue to boil for three minutes. Strain into your beverage mug. Add two tablespoons lemon juice (yes, fresh squeezed would be lovely or use reconstituted if that's all you have on hand) and two tablespoons of honey. Stir until the honey is dissolved. If upon tasting it's a bit strong, you can dilute it with additional water.
From here you can make the recipe your own. More cloves. Less honey. Adjust it to your personal taste so that you will drinks cups of it during your bout with a sore throat. It's pretty much guaranteed to take the edge of your sore throat and fill you with warm goodness.
We now have a new best friend at our house. The seven-year-old got a great playhouse out of the deal. The thirteen-year-old is just impressed. The 16-year-old loves the fact that choices are now easier. And the remaining adults are just as happy as can be. The new friend...a shiny black refrigerator with double French doors on top and a freezer compartment on the bottom.
There are many reasons why our old refrigerator needed to go, but let's just focus on how the new guy is going to help organize life in the kitchen. While helping to unload the refrigerator, a friend commented, "Wow. You certainly have a lot in your refrigerator."
I stepped back and tried to take an objective look, and yep, it was crammed to the gills. But everyone always said, "What's there to eat?"
Since I knew where every last container was, my reply would usually be, "All sorts of stuff. Can't you see the leftovers from two nights ago?"
"Nope," they would reply.
"Well, they're right here," I would retort angrily while pulling away miscellaneous containers to unearth it. Obviously time for a new routine with this new refrigerator. Especially with a second refrigerator out in the garage.
So...here's the plan. Nothing was moved back into the new refrigerator unless we actually needed it. I also set up designated areas.
Those for leftovers.
Another for ingredient-type items - lime juice, soy sauce, Worcestershire sauce, eggs.
A shelf for condiments - pretty obvious here, ketchup, mustard, mayo, etc.
This refrigerator has a great drawer for deli items so the only thing that will be allowed here will be - deli meats, sliced cheese, flavored cream cheese, etc. Sandwich makings.
Of course there are your standard crisper drawers. But they're pretty self- explanatory. As there are three of them, one has been designated for quick snack items - yogurt, baggies of jerky, precut veggies for snacks.
The shelf with milk will hold all of the dairy products - sour cream, buttermilk, etc.
And another section is just for stuff that goes on other stuff - salsa, jam, dressings, etc.
There's another section for bread-type products - tortillas, bagels, and the next loaf of unopened bread.
And my brainchild, a shelf just for those foods that were purchased for dinner this coming week. That might seem obvious, but how many times does newly purchased food become forgotten and wasted? Well, at our house it was often enough.
The freezer compartment is only going to house frozen juice cans, frozen snack food items, and anything purchased intentionally for this week's consumption. No mystery freezer bags. Those can go live outside.
The other stuff...it's going to stay in the outside refrigerator until I can purge through it. I do a lot of coupon shopping and so end up purchasing block cheese, butter, and other items that keep very well but don't need to end up in the house refrigerator. Those will be stored out there. And all the condiments or obscure ingredients that seem to keep forever, they're not coming in. I can always go out there to fetch them and promptly, hopefully, return them. As we have our own laying hens, our egg supply will be out there as well as jarred goat's milk when we starting milking again.
Now when we take a peek in the refrigerator, you can actually see what we have to eat. No excuse for not being able to make a sandwich. Easy to tell when you're on the last jug of milk. Dinner ingredients are staring at you reminding you to use them up if the weekly menu plan gets out of synch. And those lovely leftovers are front and center.
The other refrigerator was so packed that I had considered getting rid of any round storage containers as they were space wasters, but so far there's enough room that it doesn't seem necessary. Nice idea though to have square, stackable containers. And clear ones too. It's a little hard to distinguish at a glance what's inside that frosted purple container.
So what's your refrigerator like? Is it prettier on the outside than it is inside? Do you have a trick up your sleeve for keeping it organized and purged? Leave me a comment. I'm guessing this is an area that we could all tweak a bit to make more efficient for ourselves and our families.
One of the most empowering advances of the digital era has been the introduction of the digital camera. Remember the days of carefully selecting photos to take knowing that every print needed to be paid for? At least in our family that enjoying taking photographs, we almost needed to budget for the cost of developing! But with the power to now take hundreds of photos at a time and then weed through them for the keepers, I believe it has unleashed the creative side of many. Hence the development of 365 Photo a Day Projects.
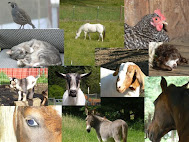
I have been intrigued by other bloggers who have begun these projects and decided that this was the year for me to do so as well. But what is a 365 Project? I did a little searching but could not find much of a definite answer other than it involves taking one photo per day for the entire 365 day year. As you can see from a few shots from my project that are sprinkled throughout this post, they can be as random as you would like. Those photos are posted to a host site where others can post their projects as well. Flickr where my photos are held allows for the author to leave a few comments regarding the nature of the photo as well. When all is said and done on December 31, you more than likely will look back on your entire year in photos and be amazed at what caught your interest each and every day or may simply just reaffirm those things that are important to you in your life. You will find a Blogger widget by Blogger Buster on the right hand side of this blog which shows thumbnails of my nine most recent photos posted to my 365 Project. I decide to use Flickr as the host source for my photos as they support a 365 Project group there. I know there are other sites as well, but this was my jumping off point. At one time I had a widget by PictoBrowser but went back to the Blogger Buster widget as it was sized better for my column. You can still see an example of PictoBrowser's widget on our hobby farm site Abernathy Creek Farm.
Because I know that I have a photo to post each day, I have started taking my camera along with me wherever I go. Sure enough, I will quite often be thankful I did. Each evening the photos are uploaded to my computer, and I sift through them for 'the one', which in itself can be a hard decision. Then I edit or crop it if needed. I'm currently using Picasa as it is simple to use and then upload it to Flickr. From there it is automatically updated to this blog. Yes, that seems like a lot of site hopping, but if I hadn't taken the plunge and just started with those applications I was familiar with then perfectionism would have once more taken over and the entire project would not have begun.
This is a perfect example of what Charlotte Mason, a brilliant educator whose methods many homeschoolers follow, would have deemed 'mother culture'...something that 'mother' can do to improve her own culture and education while being at home with her children. She obviously would have never envisioned the scope of digital photography, but she would have given it her thumbs up, and I couldn't agree more. A few books checked out from the library to read up on digital photography skills, a little more practice with my camera, stretching a bit by researching and adapting this blog to accommodate the project...it all adds up to mother culture accomplishments and a sense of pride.
Do you have a 365 Project? If so, leave a comment with your link if you would like to share. We are all so different but yet so much the same, and it is incredible to now be able to see the world through each others lens, 365 days a year.
I'm in love with cast iron pans. I've never known why. I just always knew they seared meat, made fantastic Dutch pancakes, and stayed hot enough to brown most anything put in them. Then I read Alton Brown's Gear for Your Kitchen. He put the science behind my reasoning by declaring that cast iron is a great conductor of heat because of its mass. Example of this would be when slapping a cold steak into the pan, it doesn’t lose any of its heat and can start searing immediately. But a key to cooking in cast iron is having a well-seasoned pan. Well-seasoned meaning that it has a sheen to the metal and exhibits non-stick properties of its own. Cast iron doesn't come that way from the manufacturer and quite often used pieces are either spotted with rust or simply look dull, almost dry. Those pieces are not 'goners'...no, they just need re-seasoned. And with the help of Alton, I figured out why my seasoning process was good but wasn't great. I had been using oil rather than solid vegetable shortening. Anyway, on with the good stuff and how to properly season a cast iron pan so that you will love yours as much as I love mine.
Turn your oven on to 350 degrees. A new piece of cast iron should be washed in soapy water to remove any type of manufacturing residue and then air dried. An older piece being re-seasoned doesn’t need this step.
Put a lipped cookie sheet or disposable foil pan on the bottom rack of the oven.
Place the cast iron item on the middle rack and put a tablespoon of vegetable shortening in the bottom of the pan. Using vegetable shortening is key here…the difference between my not being able to effectively season a pan before and getting perfect results now.
Once the pan has warmed enough to melt the shortening, carefully remove it from the oven and rub the entire interior surface with the shortening…inside, outside, and handles. You can use a paper towel or a pastry brush.
Now it is time to put the cast iron piece back into the oven, but this time, it needs to be put in upside down so that the excess shortening does not puddle inside and create a gummy texture.
Bake the greased cast iron for an hour, and then turn off the over and allow it to cool down and finish curing in the oven.
After it is completely cool, give the entire piece a wipe down to remove any residual shortening.
The next time you use the pan, do not scrub it within an inch of its life with soap and scrubber, but instead pour in a little coarse salt and some oil. Give all of this a rub down with a paper towel, and then wipe clean before storing. All should be good for the next time over the flame or round in the oven.
If storage were not an issue, I'd have cast iron all over the kitchen. My small skillets, large skillet, deep skillet, and Dutch oven are wonderful as is my scone pan. But on my list, would be more small skillets for individual Dutch pancakes and a double burner cast iron griddle. Someday...


.jpg)


+(2).jpg)


